Introduction
The First World War (WW1) occurred from 1914 to 1918. It was fought by the Allied Powers and the Central Powers. The Ottoman Empire, Germany, Bulgaria, and Austria-Hungary, collectively known as Turkey, were all under Central Powers. Meanwhile, countries under Allied control included France, Russia, Italy, the United Kingdom, Japan, and Australia. The Battle of Beersheba, which occurred on October 31, 1917, was a critical element in WW1. This clash pitted the British Empire’s Egyptian Expeditionary Force (EEF) against the Turkish troops. The EEF, also known as the Allied forces or Allies, was made up of soldiers from Australia, Britain, and New Zealand.
Background
The background to the battle of Beersheba can be explained through the following elements:
Location of Beersheba and Factors Contributing to the Battle of Beersheba
Beersheba was strategically located because it linked the railway line to Hebron road, which led to Jerusalem. This implies that the empire that controlled Beersheba would have access to different parts of the Sinai Peninsula. The Allied forces invaded Beersheba because it had crucial water supplies and a weaker defense than Gaza (Roxburgh, 2020). The town had 17 wells, which were critical because the area was a desert.
Event of the Battle
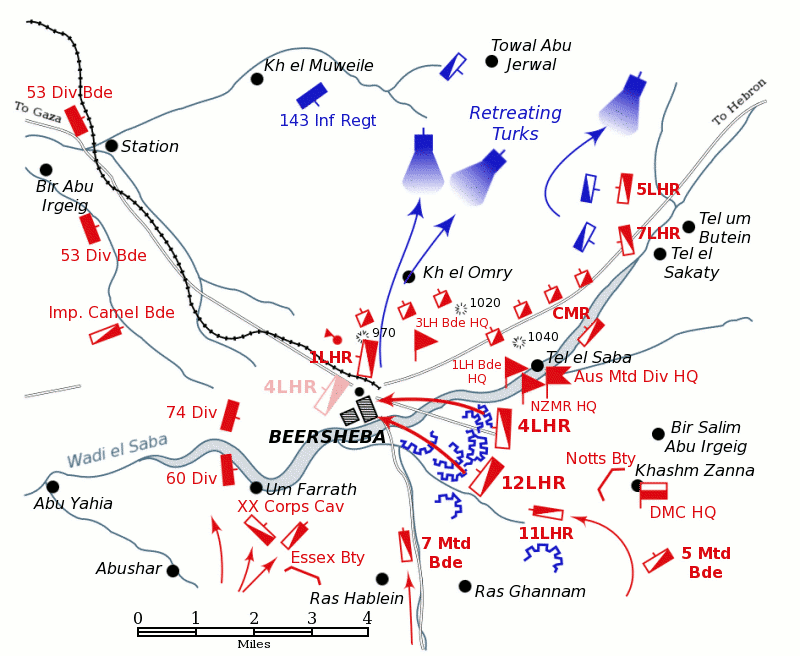
The battle began at around 6 am when the XX Corps attacked the main Ottoman entrenchment in front of the town. From 9 am, the ANZAC Mounted Divisions charged to the northeast of Beersheba to the hill of Tel el Sakati and later to Tel el Saba (Roxburgh, 2020). Their position blocked the road from Beersheba to Hebron and Jerusalem, which prevented the Turkish troops from retreating or being reinforced by their allies. The 2nd Australian Light Horse Brigade helped the ANZAC troops to capture Tel el Sakati, while the 1st Australian Light Horse Brigade supported ANZAC to seize Tel el, Saba, by 3 pm (Roxburgh, 2020). Later, the 1st and 2nd Light Horse Brigade moved to Beersheba towards the mosque to join other Allied troops fighting in the town. By 4 pm, the 4th and 12th Australian Light Horse Regiments charged into Beersheba. By 5:30 pm, Beersheba was under the control of the Allied forces.
Participation Forces in the Battle
The Allies were made up of XX corps, the Australian Mounted Division, and the ANZAC Mounted Division. The XX Corps comprised of the 60th and 74th Divisions. The Australian Mounted Division consisted of the 1st, 2nd, 4th, 5th, 7th, 11th, and 12th Light Horse Regiments, while ANZAC troops comprised Australia and New Zealand army corps (Roxburgh, 2020). The Yildirim Army soldiers who fought against the Allied forces represented the Turkish troops.
Strategies Applied by Ottoman Empire and Allied Forces in the Battle of Beersheba
The Ottoman Empire and the Allies used the following techniques during the battle;
Strategies Used by the Ottoman Empire
A system of trenches shielded the Turkish troops against firepower from the Allied forces. In addition, the trenches hindered the Allied forces from marching into the town with their horses (Australian Broadcasting Corporation, 2020). This implies that the Desert Mounted Corps had to dismount their horses to fight against the Turkish army. Similarly, the Turkish soldiers used the high ground strategy to fight their opponents. They had built several redoubts near Beersheba, which provided good zones of firing at the enemy while also protecting the soldiers against firepower (Roxburgh, 2020). Furthermore, the open terrain from the east that led to the Negev desert helped the Turks detect the Allied forces’ approach and prepare to defend their territory.
The Ottoman Empire had great weapons and soldiers who fought against the Allied forces. To counter the incursion on Beersheba, there were 4500 Turkish soldiers, nine machine guns, 28 guns, and two aircraft (Munro, 2017). Additionally, the German aircrafts used aerial attacks by dropping bombs on the regions where the Allied forces were stationed. This shows that the Ottoman Empire had fairly adequate resources to fight against the Allied soldiers, which led to the death of 31 Australian soldiers while several others were wounded (Australian War Memorial, 2021). Similarly, the Turks also applied the withdrawal strategy when they realized that the Allied forces greatly outnumbered them. They began retreating towards the north but were later taken as prisoners.
Strategies Applied by Allied Forces
The Allied forces’ ambush from different fronts of Beersheba helped to successfully defeat the Turkish soldiers. General Sir Edmund Allenby, the new leader of the EEF, implemented the plans formulated by Sir Philip Chetwode (Australian War Memorial, 2021). The Allied forces’ strategy involved invading Beersheba from the eastern side using mounted troops while the soldiers on foot marched from the southwestern part. Additionally, the Allies had gathered information from aerial photographs that the Turkish trenches on the eastern front of the town were not protected by barbed wire. This made it possible for the desert-mounted troops to march from the east, surprising the Turkish soldiers who thought that no enemy would invade from the desert. At the same time, the foot soldiers would invade Beersheba from the southwestern parts of the town (Australian War Memorial, 2021). These simultaneous attacks from different sides of the Beersheba disrupted and overwhelmed the Turkish troops leading to the victory of the Allied forces.
The Allied forces used an unusual approach during their invasion of Beersheba. In this case, the desert-mounted corps traveled from Gaza to Beersheba during the night and started their ambush at dawn. The Turks did not detect the incoming invasion, making them unprepared for battle. Additionally, using mounted troops was essential to protect the soldiers against shrapnel fire because Beersheba was surrounded by open plains (Queensland Anzac Centenary, 2018). The main strategy for the light horse soldiers was to dismount and attack their enemies from a distance. Therefore, invading Beersheba while mounting their horses which leaped over the trenches, disrupted the Turkish soldiers leading to the seizure of the town and the critical water supplies.
The maneuver warfare tactic was critical for the Allies in the battle of Beersheba. It involved convincing the Turkish soldiers that the Allies aimed to invade Gaza and not Beersheba. The Allied troops maintained a stronghold at Gaza by placing more foot soldiers by the city. As a result, the Beersheba defense was vulnerable because the Turks did not anticipate an ambush. Similarly, Beersheba was not guarded from the east because it was open terrain and a desert. The Turks believed that no army would invade from the desert (Australian Broadcasting Corporation, 2020). Therefore, the Allied forces’ surprise assault on Beersheba resulted in a triumphant victory because the Turks were not ready for a battle at the time.
The Basic Military Strategies Used in the Battle of Beersheba
Some basic military strategies were incorporated in the battle of Beersheba. The Allied forces used both exhaustion and intimidation to defeat the Turkish troops. By attacking from different sides of the town and in phases, the Allies gradually wore out the Turks, who were already outnumbered. In addition, the Allies used intimidation by capturing Tel el Saba because it ensured that the Turkish troops would not retreat or receive any reinforcements. The marching of the 4th and 12th Light Horse Regiments into Beersheba was also another sign of intimidation (Dawson, 2017). Nevertheless, extermination and annihilation strategies were not used in the battle of Beersheba because the Allies wanted to protect critical resources, especially water supplies. The Allies also imprisoned the remaining Turkish soldiers instead of killing them.
The Factors That Contributed to the Success of the Allies
The success of Allies forces can be attributed to the following principles of war:
Selection and Maintenance of the Aim
The objective had been identified before the offensive mission conducted by British General Sir Edmund Allenby. Following the two attempts by the Allies to occupy Gaza, which were both unsuccessful, Allenby adopted Chetwode’s plan that to conquer Gaza, they must first seize Beersheba (Balderstone, 2018). This is because Beersheba had a weak defense compared to Gaza. Securing Beersheba would bring a much-needed breakthrough for the Allied forces’ campaign to control the Sinai Peninsula and ensure that the shipping passages remained open to Britain and its allies (Queensland Anzac Centenary, 2018). During the invasion, the Allied forces aimed to capture Beersheba in one day to prevent the Turkish army from destroying critical resources, particularly the water wells. The surprise ambush combined with mounted troops helped the Allies obtain food, water, horses, and necessary equipment from the town. Therefore, the Allied forces overpowered the Ottoman Empire by targeting and effectively strategizing their ambush on Beersheba.
Morale
The Beersheba was popular for its wells that the Desert Mounted Corps’ horses critically needed. The Australians’ horses had traveled through the Negev Desert for several days without water (Tsang & Sahni, 2019). The Allied forces were aware that they would die of thirst if they failed to overthrow the Turkish soldiers, which motivated them to conquer and seize Beersheba. In addition, the Allied forces had demonstrated their interest in controlling the Sinai Peninsula. They had failed in their first two attacks of trying to capture Gaza and had suffered immense losses. Thus, invading Beersheba would mark their initial step in ending the Ottoman rule in Palestine and beginning the British reign in the region (Grafman, 2013). Furthermore, Beersheba was strategically located and provided access to other parts of the Sinai Peninsula. Hence, besides providing water, Beersheba was also strategically located, which motivated the Allied forces to win.
Economy of Effort
Manpower and other resources are vital in winning a battle. They, therefore, must be analyzed and utilized rationally and managed effectively in line with the strategic objectives and desired outcomes of an operation. General Allenby had reinforced and reorganized the Allied forces into various divisions, each with its attack plan. In this case, the ANZAC Mounted Division was positioned at Sakati on the Beersheba road to prevent the Turkish soldiers from receiving reinforcements from their allies. During the invasion, the Allies, about 40,000, assaulted the Turks stationed near Beersheba from different sides (Australian War Memorial, 2021). The troops combined foot soldiers and weaponry attacks on the town’s western side while two other divisions advanced on the main entrenched Ottoman forces. Additionally, the 4th and 12th Light Horse were to charge into Beersheba to protect the critical water sources (Balderstone, 2018). Generally, the Allied forces effectively exploited their resources to guarantee their triumph over the Turkish troops.
Surprise
The incursion on Beersheba was a surprise that the Turkish troops had not anticipated. The Allies launched weapon attacks at Gaza and spread false information to the Turkish soldiers to make them think that the impending invasion was again aimed at Gaza (Dawson, 2017). Therefore, the incursion in Beersheba greatly shocked the Turks, who were unprepared, resulting in their downfall. Similarly, the Allied army adopted an unconventional approach by invading the town with mounted troops who assaulted the Turks with bayonets as they marched into Beersheba (Queensland Anzac Centenary, 2018). The orders issued to the 4th Australian Light Horse Brigade included specific directions to strike the Turks from behind and capture the wells at Beersheba. Due to the high speed with which the mounted soldiers attacked as they entered the town, coupled with coordinated onslaughts from foot soldiers from different sides, the Turkish army was disrupted and overwhelmed, leading to its downfall.
Offensive Action
The main Turkish defense at Beersheba involved around 4500 soldiers who had been deployed in trenches located in the northwestern, southern, and western fronts of the town. However, the eastern front only had a redoubt at the Tel el Saba manned by a battalion (Dawson, 2017). Allenby’s plan was for the XX Corps to invade Beersheba’s entrenched positions from the west. At the same time, the Desert Mounted Corps were to seize Tel el Sakati and Tel el Saba to prevent the Turkish troops from retreating or receiving reinforcements (Australian War Memorial, 2021). The 1st and 2nd Light Horse Brigades joined other forces and attacked from the area around the mosque into the town. Finally, the 4th and 12th Light Horse Regiments marched into Beersheba, fighting the Turkish soldiers on their way, and successfully took control of the town and its water supplies (Dawson, 2017). The Allies’ strategic and aggressive combat plan significantly contributed to their triumph.
Lessons Learned
Thorough and adequate preparations are vital before engaging in a battle. The Allies did not prepare enough water supplies for the men and horses. In this case, the Desert Mounted troops and their horses traveled through the desert and lacked water for several days (Tsang & Sahni, 2019). If the Allies had lost the battle, they would have been captured, killed, or died due to thirst. In addition, the mounted troops traveled from Gaza to Beersheba during the night to avoid being detected by the Turkish soldiers. The invasion into Beersheba began at dawn and lasted the entire day. This shows that the troops were exhausted and weak from traveling the whole night and did not have enough time to rest and recover their energy. Therefore, had it not been for the surprise attack that overwhelmed the Turks, the Allies risked suffering another defeat as a result of poor preparations. Thus, the field war environment must be considered before any decisions are made.
Poor strategic planning during combat results in massive losses and defeat. The Turks should have considered occupying Tel el Saba in defense of Beersheba because it was a strategic position to counter the Allied incursion. Tel el Saba was a vital station for the Turkish troops because it would have provided an avenue for the retreat from Beersheba and offered access to more reinforcements from their allies from other parts of the Sinai Peninsula. The Turkish soldiers were unprepared for war which led to their downfall. They had strategic high grounds to strike the enemy from afar, but they lost these positions to the Allied forces. In addition, there was also poor coordination among the Turkish troops. For example, during the battle, the German forces began to drop bombs on the headquarters of the ANZAC Mounted Divisions, who had already captured Tel el Saba (Roxburgh, 2020). Instead, the aircraft should have launched continuous air attacks against the Allied soldiers breaching the town.
Offensive operations are very critical in achieving victory in battles. In this case, the maneuver warfare strategy employed by the Allies significantly helped them overpower the Turkish troops. Due to the surprise invasion, the Turkish soldiers were unprepared, which led to their defeat. Additionally, the ambush from different directions and phases combined with the mounted troops’ invasion incredibly overwhelmed and disrupted the Turkish line of defense, forcing them to retreat towards the north. Therefore, good strategies are fundamental to triumphing in any battle or war.
Evaluation of Lessons Learned and the Application to Contemporary Operating Environment and Future Operations
The lessons learned from the battle of Beersheba can be applied to the contemporary environment and future operations. In this case, before engaging in combat, the military leaders should ensure adequate and proper planning. Planning does not only involve the strategic locations and invasion techniques only but also ensures that the troops have sufficient resources in regards to food, water, and machinery. Poor planning may jeopardize a military operation; for example, the lack of water almost compromised the Allied forces’ operations at Beersheba. In addition, during any war or battle, all soldiers should always be prepared for attacks. The Turkish troops were defeated because they were unprepared.
Effective coordination is also vital in the success of any combat. The Turkish army displayed a lack of coordination when the German aircraft began to bomb the headquarters of the Desert Mounted Corps instead of targeting the Allied forces breaching Beersheba. Equally important, military leaders need to ensure that their troops are motivated enough to win a battle. When soldiers are unmotivated, they may make errors that may sabotage the team leading to a defeat. In the case of the Allies, the troops were motivated to seize Beersheba to access water supplies.
Military leaders should employ offensive actions in their operations to increase their chances of winning. Offensive actions are characterized by an element of surprise, tempo, and concentration. Surprise involves ambushing opponents at a place, manner, or time they did not anticipate, making them unprepared. In this case, the Allies invaded Beersheba when the Turkish troops believed they would invade Gaza. Tempo refers to changing the speed with which the onslaughts are made. The effect of tempo was evident when the 4th and 12th Light Horse Brigades charged at Beersheba, disrupting the Turkish defenses and capturing the town (Dawson, 2017). Similarly, the concentration which entails amassing considerable combat power to accomplish a given objective is essential in war. For example, after the Allies failed to seize Gaza, they reinforced their troops and changed their focus to invading Beersheba. During the incursion, about 40,000 Allied troops fought against 4500 Turkish soldiers (Australian War Memorial, 2021). This shows that the concentration of human and machinery is vital in winning a battle.
Conclusion
The battle of Beersheba took place in 1917 and was fought by the Turkish soldiers and the EEF. The Turkish soldiers represented the Ottoman Empire which had great control over the Peninsula. Alternatively, the EEF comprised Britain, New Zealand, and Australian soldiers. The
Allies targeted Beersheba because it had weaker defenses than Gaza and connected the railway line to Hebron road, which led to Jerusalem. Beersheba was also the only source of water in the region.
Various factors contributed to the tremendous success of the Allies. The selection and maintenance of aim was one of the critical elements leading to the triumph of British and its allies. Having been defeated by the Turkish troops in their attempt to capture Gaza, the Allied forces focused all their attention on invading Beersheba, which would be their initial step to controlling the Sinai Peninsula. In addition, the troops were motivated to win the battle to gain access to water. Similarly, the surprise attack on Beersheba disrupted and overwhelmed the Turkish defense lines because they were unprepared. Additionally, the use of offensive actions by the Allies resulted in a huge success. Allenby’s great strategy, including the mounted troops, significantly influenced their victory. Alternatively, the lack of preparedness and poor coordination led to the defeat of the Turkish soldiers.
The battle of Beersheba presents several lessons which can be incorporated into contemporary and future operations. For instance, there is a need for adequate planning before combat. This includes planning for the basic needs such as food and water in addition to the invasion techniques and other strategies. All soldiers should also be prepared for an ambush from all directions and at any time to avoid the element of surprise. In addition, military leaders should incorporate offensive actions in their operations to guarantee success in battles or wars.
References
Australian Broadcasting Corporation. (2020). Battle of Beersheba and the southern Palestine offensive: June 1917-October 1918. Web.
Australian War Memorial. (2021). The charge of the 4th Light Horse Brigade at Beersheba. Web.
Balderstone, S. (2018). Memorialising Beersheba. Historic Environment, 30 (1), 1-28. Web.
Dawson, C. J. (2017). The third battle of Gaza, October-November 1917. Royal United Service Institute for Defence and Security Studies, 68 (3), 25–28. Web.
Grafman, Z. (2013). The battle of Beersheba strategic and tactical pivot of Palestine (Corpus ID: 107628435) [Master’s Thesis, Liberty University]. Semantic Scholar.
Munro, K. (2017). Australia’s forgotten victory: What happened at the battle of Beersheba? SBS News. Web.
Queensland Anzac Centenary. (2018). The battle of Beersheba. Queensland Government.
Roxburgh, R. (2020). Battle of Beersheba. Australian Broadcasting Corporation.
Tsang, A. & Sahni, N. (2019). World war one and battle of Beersheba. City of Parramatta.