Introduction
The project included designing and repairing aircrafts in a for Phonetic Airlines. It also assimilated learning from first hand experiences in handling electrical wires and soldering processes in the workshop. It guaranteed exposure to high combustive materials such as lead and iron, and exposure to hot furnaces and poisonous gases, therefore a lot of precautions had to be taken into account for the wellness of the workers, as well as the success of each task.
Ensuring a Correctly Crimped Electrical Cable End Fitting
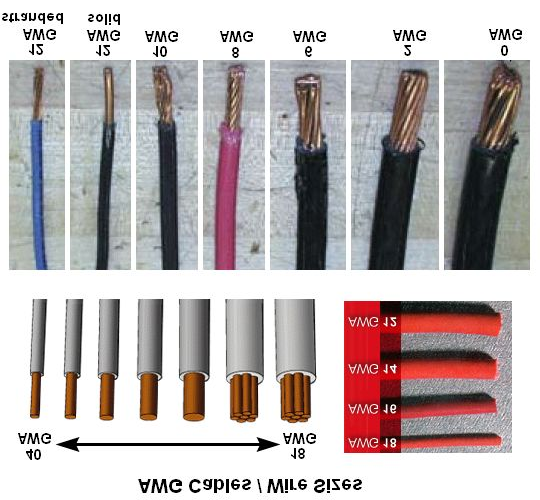
The first step is to understand the requirements of the equipment to find the right type of wire crimping. Considering the wire size, it is generally the American wire gauge. Another way to determine the wire size is to strip a small length of the wire insulation, count the individual wire strands, and measure the diameter of one strand (Mestayer et al., 2020, p.21). To determine the size of the crimp, multiply the number of strands by the diameter of one strand. Secondly, select a crimp terminal. The quality of the crimp joint depends on the deal of terminal chosen. Consider plating, pre-insulation, and turned pin.

The precautions when crimping an electrical cable are: prevent cutting of wire conductors, uneven stripping length, and insufficient cutting of insulators. Check the crimping height to ensure quality management (Love, 2018, p.21). Do not excessively twist the strands. Ensure that the wires are not connected to a direct source of electricity (Kivanc, 2018, p.40). Always use wires with individual strands and not solid cables. Every crimping tool must have the ratchet feature. Perform tests on the wires before starting the crimping process.

Workshop Fitting Exercise
Soldering: A soldering iron was required to complete the task. Check that it has the correct solder tip. The Rosin Core solder was used. Rosin will help the solder flow onto the wires. To solder, a versatile powder known as Soldering Station is used. The desoldering gun could be used to improve a previous solder job (Love, 2018, p.21).
Desoldering is the process of removing the solder from a connection in order to disconnect it from the circuit. We use a tool known as a desoldering gun (Carraway, 2019, p.71). This device’s vacuum pump’s heating tip is integrated. Desoldering is a simple process, but there are steps to take to ensure that it is done properly and safely (Love, 2018, p.21). When the desoldering is finished, the components you’re attempting to remove should be easy to transfer.
Safety Precautions when Soldering Iron
The safety precautions when using a soldering iron are: Avoid catching the tip of the soldering iron since it burns at about 400 degrees Celsius (Love, 2018, p.21). Instead, hold the wires with tweezers, pliers, or clamps to avoid being burned. Frequently clean the sponge wet when you’re using it. Soldering should occur in a solid and level ground or surface and return the iron to its position when not used (Cao et al., 2020, 5412). Unplug it from the source of electricity when not in use. Conduct your work in a well-ventilated area to avoid inhalation of smoke formed when soldering. Wear eye protection since solder can spit when using it.
Inspecting a Soldered Joint
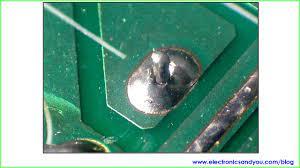
A good solder joint should not have too much solder but rather a shiny finish. Ensure that the contour around the joint of the solder is concave (Wu & Xu, 2018, p.91). Too much solder can cause a short circuit. Avoid dry joints, which are evident when the solder joints are in an open course, intermittent or noisy. Ensure the solder is secure so it might not move during the process. Ensure that the soldering iron is not left for too long in the joint since it might lead to a dry joint (Lövberg, et al., 2018, p.7). Before moving the solder joints, ensure that it cools and solidifies. Ensure that the soldier does not make noise or have any resistance.

Solder Hook Terminals and Cup Terminals
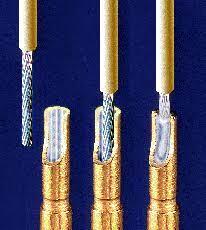
There are two methods of soldering cup terminals. First, position the wire into the cup terminal. Place the cut surface of the soldering tip to the lead and terminal together to heat them (Cheng et al., 2019, p.21). Allow the solder to melt, and remove the soldering iron. Hold the lead wire into the cup until the solder has cooled and hardened. In the end, the soldering iron will be attached to the cup terminal. Getting the amount of solder in the cup terminal might require multiple tries.
Secondly, fold the length of the solder wire into itself and twist it. Place it into the cup terminal and trim it until it levels with the top of the solder wire. Heat and melt the back of the cup terminal with a soldering tip till the solder has melted (Alonso Barbero, 2018, p.222). Once it is melted, place the lead wire and dispose of the soldering information (Uzun et al., 2021). Keep the lead wire and the solder in contact until it has hardened and cooled. Before the fixation, ensure you remove the gold coating inside the terminal for the solder to adhere better.

Conclusion
Safety in the workshops should be taken into account in order to ensure the success of the projects, as well as the safety of the workers. It also involves full knowledge of the procedures and techniques of the processes and learning new skills in the workshop. Operating machinery lead to the required exposure to firsthand experience, engineering techniques and management.
References
Alonso Barbero, C., 2018. Design of a test system for embedded processor boards (Master’s thesis, Universitat Politècnica de Catalunya).
Carraway, G. (2019) 5 steps to achieve wire crimping, Carr Manufacturing. Web.
Cao, J., Yang, H. and Liu, W., 2020, November. Design and Realization of A Wireless Heating Electric Soldering Iron. In 2020 Chinese Automation Congress (CAC) (pp. 5214-5216). IEEE.
Chen, Y., Zhang, Z., Zhang, M., Yang, M., Xia, Z. and Yuan, C., 2019, August ‘Reliability study on the encapsulated space cable assembly under accelerated tests’, In 2019 20th International Conference on Electronic Packaging Technology (ICEPT) (pp. 1-4). IEEE.
Kivanc, O.C., Ozgonenel, O. and Bostan, O., 2019, November ‘New Generation Plug-in Cable Design and Product Development for White Goods-Cold Plug’, In 2019 11th International Conference on Electrical and Electronics Engineering (ELECO) (pp. 39-43). IEEE.
Love, T.S. and Tomlinson, J., 2018 ‘safer soldering guidelines and instructional resources’, Technology and Engineering Teacher, 77(5), pp.20-22.
Lövberg, A., Tegehall, P.E., Akbari, S. and Andersson, D., 2018, April ‘On the formation and propagation of laminate cracks and their influence on the fatigue lives of solder joints’, In 2018 19th International Conference on Thermal, Mechanical and Multi-Physics Simulation and Experiments in Microelectronics and Microsystems (EuroSimE) (pp. 1-13). IEEE.
Mestayer, M.D., Adhikari, K., Bennett, R.P., Bueltmann, S., Chetry, T., Christo, S.B., Cook IV, M., Cuevas, R.C., Dodge, G.E., El Fassi, L. and Forest, T.A., 2020 ‘The CLAS12 drift chamber system’, Nuclear Instruments and Methods in Physics Research Section A: Accelerators, Spectrometers, Detectors and Associated Equipment, 959, p.163518.
Uzun, U.E., Karademir, T., Pamuk, N. and Nevzat, O.N.A.T., 2021 ‘Methods and Devices Used in Determining the Quality of Electric Wires Terminal Crimping’, Avrupa Bilim ve Teknoloji Dergisi, p.221-227.
Wu, H. and Xu, X., 2018 ‘Solder joint inspection using eigensolder features’, Soldering & Surface Mount Technology.