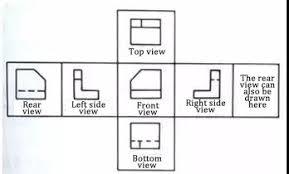
The 3rd Angle Projection refers to a technique of drawing an object or an image from differing directions; these are normally the front, side, and plan view drawn in order to make all the essential sides or faces visible. In this form of projection, every view of the diagram is projected in an opposing sense of sight of the particle. For this drawing concept, the diagram is stationed in the third quadrant. The image is put at the back of the perpendicular plane and below the horizontal plane. The concept of the third angle projection is widely applied in the American States (Reimer et al. 148-153). The projection places the plane at the center of the particle and observer. In addition, for the third angle projection, the plane of projection is taken as transparent in 3rd angle projection.
The third angle projection is among the concepts of orthographic projection, which is applied in technical drawing and is basically made up of three major views. These views are; the top part, the front part, and the side part. In the use of the third angle projection to come up with a figure with the three views, the side that is more widespread of the diagram is normally started with (front view side). The top view part is right on the front view, while the side view part is located on either the left or right side of the object. This suggests that the right view gets projected on the same side of the front view (right side), whereas the top view gets projected up on the front view side.

Works Cited
Reimer, Christian et al. “High-Dimensional One-Way Quantum Processing Implemented on D-Level Cluster States.” Nature Physics, vol. 15, no. 2, 2019, pp. 148-153.
“What are the Differences between Foreign Mechanical Drawings and Domestic Mechanical Drawings?” Sun Bearing, 2020.